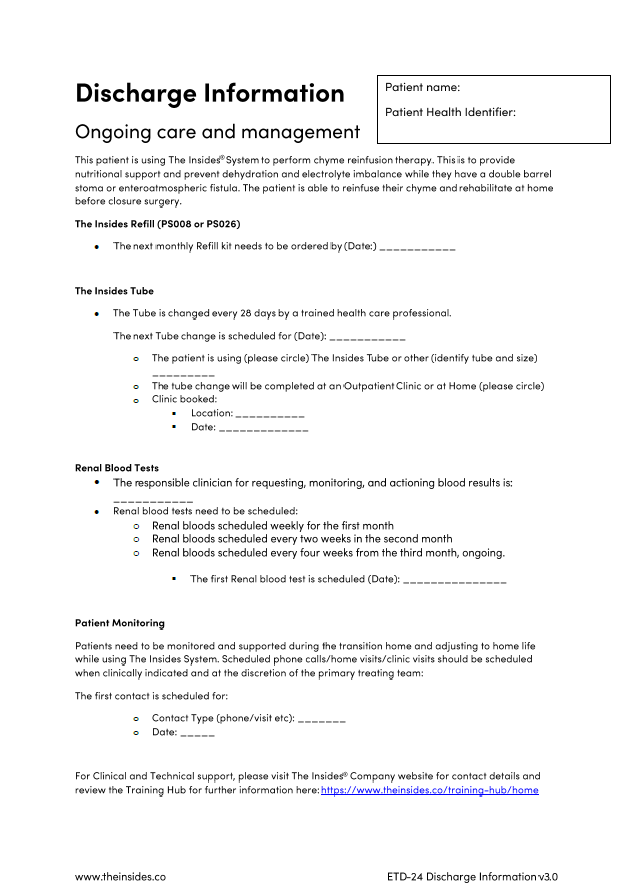
Click here to download the PDF
1. Purpose
This document provides guidance for healthcare professionals managing situations where The Insides Tube has migrated into the distal intestine. It is intended to support safe and effective clinical decision-making, helping to minimise the risk of patient harm. The information contained here should be used as supplementary material alongside the clinical judgment and expertise of the treating healthcare team.
2. Scope
This document applies to specialised colorectal and/or gastroenterology multidisciplinary teams that manage patients who are performing chyme reinfusion therapy with The Insides System. This includes Colorectal surgeons, Gastroenterologists, Stomal therapy nurses who have been trained to install The Insides System, troubleshoot, and support patients’ day to day with using the device.
There is a low risk that The Insides Tube may migrate into the intestine, generally due to peristalsis. This document will provide a trained healthcare professional with guidance on the safe and effective management of such occurrences, including the process to safely remove The Insides Tube.
3. Definitions
Tube Migration - If The Insides Tube migrates into the distal intestine, it either gets completely drawn in or it partially drawn in with The Insides Pump stopping it from being drawn in any further.
Common terms:
• Tube or catheter ingress
• Tube or catheter displacement
• Tube or catheter pushed in
• Tube or catheter sucked in
• Tube or catheter migration
• Tube or catheter completely disappears
Tube - The Insides Tube
Pump - The Insides Pump
4. Responsibilities
It is the responsibility of the healthcare professional managing the day-to-day care of the patient to provide all the training to the patient, so they are able to manage and troubleshoot the device themselves. During this initial training period, the patient should be supplied with the contact numbers of their healthcare team, so they know who to call in an emergency.
5. Identification and Clinical Management Steps
Note: If a patient is at home in the community, the patient must be reviewed face to face by their healthcare professional; do not let the patient attempt the removal of the Tube themselves.
The following procedure should be completed by a trained health care professional and we suggest having a second healthcare professional assisting:
1. Ensure the patient is comfortable
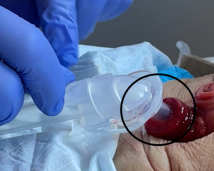
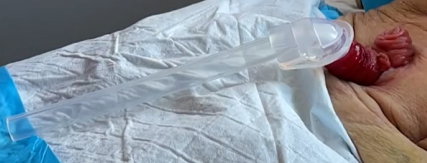
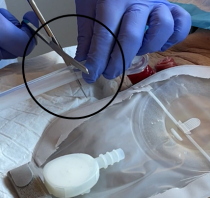
2. Stop the tube from migrating further into the intestine by securing with metal forceps, or other suitable means. If the Pump is the only accessible component, this can be secured, however do not pull on it.
3. Administration of antispasmodic medication is recommended. Be aware of the medication’s onset of action.
4. If the Pump is accessible and is still attached to the Tube, DO NOT REMOVE IT from the Tube.
5. If the Tube is still visible:
a) Suggest use of metal forceps so a firm grip of the Tube can be achieved.
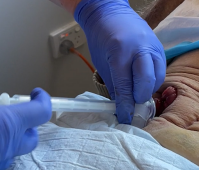
b) Place the forceps around the Tube and pull slowly and consistently. This may take several minutes.
i. Ensure the retention sleeve comes with the Tube. This is where the second healthcare professional may be necessary to manipulate/guide the retention sleeve through the fascial opening either digitally or with a second set of metal forceps
ii. If the Tube feels like it is suctioned in place, fill a ‘catheter tip syringe’ with potable water or saline and administer this down the tube so that it can trickle out of the bulbous end and release the suction.
c) Once out, discard this Tube and replace with a new tube so the patient can continue chyme reinfusion. Prior to inserting a tube, evaluate the patients facial opening to ensure that the tube will not migrate into the intestine. A radiological study may need to be performed to ensure that there is no damage to the intestine. Follow the instructions for Tube insertion in The Insides System Setup Guide for Healthcare Professionals. A video of a Tube insertion is available on the Training Hub (www.theinsides.co/training-hub/home)
d) Take this opportunity to refresh information to the patient about being mindful of vigorous exercise and any abdominal-centric movements such as bending over for long periods of time
e) Once the intervention is complete, report the incident to your local distributor of The Insides System and/or The Insides Company
6. If the Tube is not visible:
a. Radiographic imaging can be used to locate the Tube, Retention Sleeve and Pump
b. Endoscopic removal can be the safest option depending on the location of the Tube
i. ENSURE the Retention Sleeve is removed at the same time as the Tube is removed
c. Once out, discard the Tube
i. If the Tube removal was difficult or there is evidence of bowel injury, we recommend re-imaging the distal bowel with contrast before recommencing chyme reinfusion therapy.
ii. If the Tube removal was routine with no abnormalities seen during the endoscopic intervention, replace with a new Tube so the patient can continue chyme reinfusion. Follow the instructions for Tube insertion in The Insides System Setup Guide for Healthcare Professionals. A video of a Tube insertion is available on the Training Hub (www.theinsides.co/training-hub/home)
d. Take this opportunity to refresh information to the patient about being mindful of vigorous exercise and any abdominal-centric movements such as bending over for long periods of time
e. Once the intervention is complete, report the incident to your local distributor of The Insides System and/or The Insides Company
6. Training and Education
• The Insides Company Clinical team are available for refresher training, complex patient management discussions, and technical support. Please contact them on clinical@theinsides.co or support@theinsides.co
• The Insides Company Training Hub contains up-to-date information, documents for download, and training videos. www.theinsides.co./training-hub/home
Exclusion
The Insides® Company maintain a clinical registry for all patients that use (any form of) CRT. Patient consent is required to enter the patient’s de-identified data. The objective of the Registry is to track patients weaning off PN and EN, increasing their oral feeding and CRT, and safety and efficacy of the device. Submission of patient data is not mandatory for use of The Insides® System but is recommended to provide on-going quality assurance.
Due to the anatomy of the EAF, the choice of feeding tube for use in CR requires careful consideration.
For patients who have been defunctioned for >6 months
For patients who have been defunctioned for <6 months
Things to remember,

Chyme (kaɪm) is the medical term for the brown/green/yellow fluid that comes from your fistula or stoma. It is the watery or pulpy liquid you see in your ostomy appliance. Chyme is made up of all the food and fluids that you eat and drink, plus the digestive juices that your body adds to help breakdown food. Chyme keeps you hydrated, nourished, and your body functioning.
You have a fistula or stoma somewhere along your small intestine. This means chyme leaves your body earlier than expected and does not pass through the rest of your intestines where some of it would normally be absorbed. This puts you at higher risk of becoming dehydrated and malnourished.
Chyme reinfusion therapy is a treatment method for patients like you with fistulas and stomas. Chyme reinfusion therapy involves returning chyme from your ostomy appliance back into the rest of your intestines through the opening of your fistula or stoma. Returning chyme to your body gives the rest of your intestine the chance to absorb the valuable nutrients to keep you hydrated and nourished.

Research shows that chyme reinfusion therapy has benefits for maintaining your gut health, keeps you hydrated and well-nourished, and better prepares your intestines for fistula or stoma reversal.
Performing chyme reinfusion therapy can:
• Keep the remaining part of your intestine working and rehabilitated. Without chyme reinfusion therapy, it will start to shrink due to lack of use. Reinfusing chyme keeps your intestine healthy so that it will begin working immediately after your reversal surgery.
• Rehabilitate your large intestine with healthy bacteria (microbiome) to help your body breakdown and absorb chyme.
• Maintain the health of your entire digestive tract, keeping you hydrated. Chyme reinfusion therapy may reduce the need for intravenous (IV) fluids. Chyme contains electrolytes, such as salt, which will help keep your system balanced and reduces kidney damage.
• Help you to have regular bowel movements again.
• Reduce the amount of time you might spend in the hospital.
• If you need IV nutritional support, reinfusing chyme encourages your liver to keep working, making digestive enzymes needed to breakdown food, reducing long-term liver damage.
Performing Chyme Reinfusion Therapy
Chyme reinfusion therapy can be done two ways: manually or with a medical device called The Insides® System.
If performing manual chyme reinfusion, a nurse will insert a tube into the downstream hole of your stoma. The chyme is taken out of your ostomy appliance, strained, and drawn up into a syringe. It is then syringed down a tube multiple times a day.
The frequency at which the nurse needs to perform this depends on how much chyme you pass into your ostomy appliance and how often you would normally empty it.
Alternatively, chyme reinfusion therapy can be done using The Insides® System (explained overleaf).
Chyme reinfusion therapy can be done two ways: manually or with a medical device called The Insides® System.
If performing manual chyme reinfusion, a nurse will insert a tube into the downstream hole of your stoma. The chyme is taken out of your ostomy appliance, strained, and drawn up into a syringe. It is then syringed down a tube multiple times a day.
The frequency at which the nurse needs to perform this depends on how much chyme you pass into your ostomy appliance and how often you would normally empty it.
Alternatively, chyme reinfusion therapy can be done using The Insides® System (explained overleaf).
The Insides® System is a medical device that helps you perform chyme reinfusion therapy by yourself. The device is made up of three parts:
• The Insides® Tube (Tube) is placed in your fistula or stoma’s downstream intestine by a healthcare professional and sits inside your ostomy appliance. The Tube is changed every month by your healthcare professional; otherwise, it remains in the stoma throughout refeeding. Although you will be aware of the Tube, it will not be uncomfortable.
• The Insides® Pump (Pump) is a device that slides onto the end of the Tube and is replaced every 2-3 days when changing your ostomy appliance. The Pump sits submerged in the chyme in your ostomy appliance.
• The Insides® Driver (Driver) is a handheld device that you use throughout the day to actively pump chyme from your ostomy appliance into the lower intestine through your fistula or stoma.
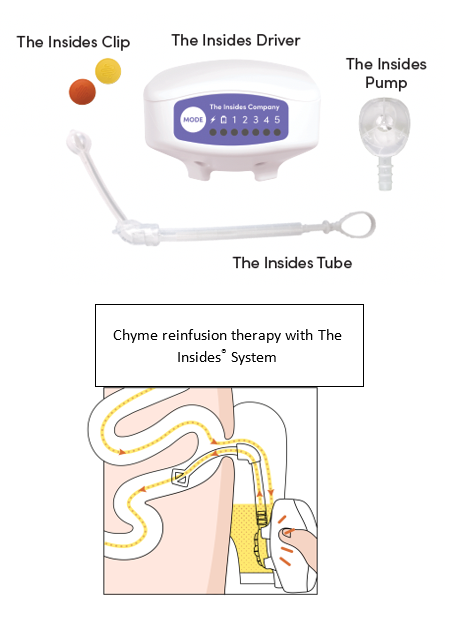
The following information will guide you on what you to expect while using The Insides® System.
The First Week
It takes approximately one hour to set up The Insides® System and teach you how to use it. This can be done in a hospital, at home, or in a health clinic.
You will only use the device once or twice a day in the first week to minimise lower tummy discomfort, allowing your intestine to rehabilitate slowly. Your intestine has shrunk while it has been out of use. Putting your chyme down it again is like waking it back up. The first week is the hardest week due to this rehabilitation and it can be uncomfortable until you have had your first few bowel movements. You will discard all remaining chyme in your ostomy appliance into the toilet.
In addition to this, you will also be learning how to change your ostomy appliance with the tube in place. Your stoma nurse is there to support and help you modify how you change your ostomy appliance. Learning to chew your food more and avoiding overly fibrous food will also be a learning process. Please be reassured it does get easier after the first week!
Weeks Two and Three
You will likely have your first bowel movement by the end of your first week. By now, your body should be used to pumping chyme, and your lower tummy discomfort should be disappearing.
You should now be able to pump more often throughout the day. Pumping more often means you will have more bowel movements. Slowly increase the number of times you pump each day based on your comfort level. If you have questions about how much you should pump, speak with your healthcare team.
The Fourth Week
You will arrange an appointment with your healthcare team to change your tube and see how you're doing. You should be feeling comfortable with the device, pumping more often throughout the day, and having regular bowel movements. Based on your progress, your surgeon and healthcare team will be able to tell you how long you will have The Insides® System for.
Your healthcare team will help with your care by providing The Insides® System for your treatment; they have been trained in how to use The Insides® System. Your healthcare team can provide you with the information needed to use The Insides® System safely and effectively.
To prepare for chyme reinfusion therapy using The Insides® System, you will need:
• A positive attitude and commitment to your health.
• To make some small modifications to your diet so that The Insides® Pump will work properly.
• To chew your food well and drink plenty of water.
Set-up a routine for yourself as early as possible to ease the transition into reinfusing your chyme. The following guidance comes from patients that have used the System before you, who want to ensure you have a good experience in your first week. You will become an expert by experience very quickly.
• Find the most comfortable position for you to hold the Driver. You will be completing multiple reinfusions throughout the day so it must be comfortable for you.
• Ensure you are getting enough sleep at night. Forgo a reinfusion to get quality sleep.
• Continue taking your prescribed medication and speaking to your health care team when your output/chyme is starting to get too thick to pump. This is expected, and they will guide you on how to keep it thin.
• Practice many times, with supervision from your stoma nurse, changing your ostomy appliance. Threading the ostomy appliance over the Tube takes practice to not accidently pull it out.
• Ensure you feel confident to reinfuse your chyme and safely change your ostomy appliance before discharge
• Your healthcare team will likely give you a laboratory form to complete renal bloods every 1-2 weeks, once you’re home
• 1st day: - reinfuse your chyme one to three times only. About 80 – 100mls each time
• 2nd day: reinfuse your chyme two to four times only. About 80- 100mls each time
• 3rd day: reinfuse your chyme two to four times only. About 100mls – 200mls
o It is the 3rd day - change the Pump and your ostomy appliance
• 4th day: reinfuse your chyme three to five times
• 5th day: continue increasing volume and frequency each day if there is no discomfort, minimal reflux, and pain
• 7th day: You will start to feel confident about reinfusing your chyme about now so your healthcare team will start to reduce your anti-motility medication and your IV nutrition (if you required this)
• By 8 - 14 days, you will likely be reinfusing at least 90% of your chyme each day
When you look down at your stoma or fistula, you should be able to see the Retention sleeve, the Tube, and the Pump.
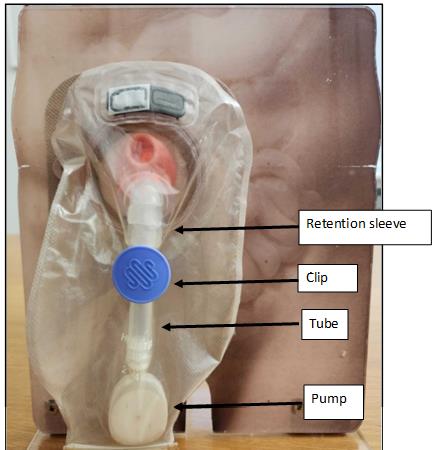
If you notice that it looks different, for example.
· the Tube is sitting at the bottom of the bag or
· you can’t see the Retention sleeve or Tube anymore
Please call your healthcare professional urgently


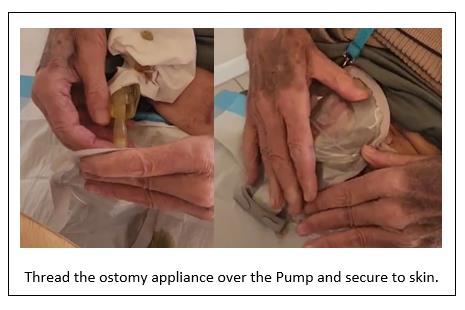
Efficient Refeeding
1. Reinfuse chyme when The Insides® Pump is completely submerged in chyme, reinfuse little and often.
2. Make sure the pump is changed at least every 3rd day.
3. If you’re experiencing nausea, bloating, and/or stomach cramps – reduce the speed and slowly reinfuse. Only reinfuse 1-2 times per day under the guidance of your health care professional until it resolves. Discomfort will reduce over time, if it continues for longer than 2 weeks, please contact your health care professional.
4. Release excess wind in the ostomy appliance. Press out the wind via the opening at end of pouch or uncoupling the pouch from the base plate.
5. Do not let the ostomy appliance overfill. Reinfuse once you see The Insides® Pump is submerged.
6. Do not refeed chyme which has been sitting in the ostomy appliance for longer than 12 hours. Measure and discard this chyme.
7. There will be approximately 20ml of chyme sitting in the bottom of the ostomy appliance when you finish refeeding due to it sitting below the level of the Pump. As you become more independent, you will be able to fold up the bottom of the ostomy appliance and refeed it or you may choose to discard it.
8. Charge The Insides® Driver when the lightning bolt flashes amber. It will take 4 hours.
9. Ensure you fill in the logbook every day and take it with you to show your healthcare team.
Troubleshooting
1. If the tube falls out - contact your health care professional that is monitoring you on this device, do not replace The Insides® Tube yourself. Please take the Tube in a Ziplock bag with you to the appointment.
2. If you’re experiencing reflux around The Insides® Tube it does not cause harm but will increase the reinfusing time. Reflux is expected when you are rehabilitating the distal bowel.
a. Use the lowest speed that moves the chyme through The Insides® Tube.
b. Reinfuse a little and often to allow the intestine to absorb the chyme that has been pumped.
c. You may be constipated downstream – under the guidance of your health care professional, ensure you are reducing your anti–motility drugs i.e. Loperamide.
d. If reflux continues, please contact your health care professional.
3. If chyme is not moving up the tube, there could be several reasons:
a. Blocked pump: - Change The Insides® Pump. Avoid stringy fibrous food which can block The Insides® Pump.
b. Ensure The Insides® Pump is fully submerged in the chyme.
c. If your chyme is too thick, discard into the toilet and work on thinning your output for the next reinfusion. Drink a glass of water or cup of coffee.
d. The Insides® Driver – Ensure all speeds have been tried for a minimum of 30 seconds each, sometimes the thicker consistency’s move slowly up The Insides® Tube.
e. Not coupled correctly – Ensure the flat surface of The Insides® Pump has been cleared of debris and intuitively couple The Insides® Driver with The Insides® Pump through the ostomy appliance. Carefully hold The Insides® Driver up and The Insides® Pump should remain coupled. This demonstrates they are coupled effectively.
f. The Insides® Driver bounces off The Insides® Pump – This can happen at speed 5 when the chyme is too thick or if The Insides® Pump is blocked.
Dietary Guidelines for Patients
This document should be used as a guide only and provides suggestions on foods that will make your chyme work efficiently with the Pump.
For dietary advice specific to your condition, please consult with your Dietetics team
• Eat slowly and chew your food well.
• Swallowing air while eating can increase wind (e.g., Carbonated drinks)
• Avoid drinking through a straw or chewing gum.
Foods to avoid
(Because they block The Insides® Pump more readily)
• Sweetcorn
• Nuts and seeds (smooth nut butters are ok) (including baked into foods like muffins, cakes and chocolate)
• Coleslaw
• Popcorn
• Stringy fruit & vegetables (e.g. celery, lettuce, including baked into foods like frittata)
• Coconut
• Pineapple
• Mango
• Peas
• Dried fruit
• Raw vegetables with skins (e.g. Potato skins, onion, tomato)
• Wholegrains
• Pith (e.g. from oranges & mandarins)
• Tough pieces of meat that require a lot of chewing
Foods that can increase wind
• Green leafy vegetables
• Pulses (e.g. peas, beans, lentils)
• Onions
• Garlic
• Fizzy drinks
• Beer
• Brassicas (e.g. broccoli, cauliflower, cabbage)
• Asparagus
Foods that will cause watery or increased output
• Alcohol
• Caffeine containing drinks e.g. coffee
• Fruit juice or sugary drinks
• Green leafy vegetables
• Fatty foods
• Fish
• Onions
• Spicy foods
• Raw vegetables
• Chocolate
Contact details
Your Hospital: _____________________________________
Your Surgeon: _____________________________________
Your Stoma Nurse: _________________________________
Email: ______________________________________
Telephone: __________________________________
After-hours urgent contact:
_________________________________
_________________________________
I started The Insides System on: ____ / ____ / ____
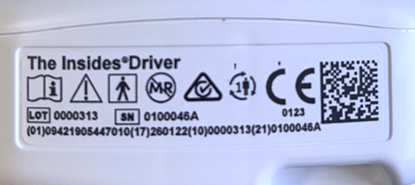
Serial number of your Driver (Located on the back of your Driver):
____________________
My Tube needs changing: ____ / ____ / ____
Please ensure the patient does not meet any of the contraindications outlined in the Instructions for Use
Prior to commencing chyme reinfusion therapy the patient’s distal intestinal limb must be checked to ensure patency (integrity of bowel, identify any bowel wall defects, anastomotic leaks, stenosis, narrowing, or kinking). A method of doing this is contrast imaging.
• Chyme reinfusion therapy may not be appropriate for patients with a distal stenosis from inflammatory bowel disease due to the aetiology of stenosis.
• Patients with a distal stenosis from other aetiology can be dilated before starting chyme reinfusion therapy if safe to do so.
• During installation of a tube, do not advance the tube if there is significant resistance, or if advancement causes the patient to experience pain.
The Insides System contains two sizes of The Insides Tube, 28 Fr and 22 Fr. As a general guide:
• The 28 Fr is suitable for most enterostomy patients within six months of enterostomy formation.
• The 22 Fr is suitable if the patient has:
o been defunctioned for over six months, or
o an enteroatmospheric fistula (EAF)
If the healthcare professional appropriately trained in intestinal intubation determines that neither the 28 Fr or 22 Fr tube sizes are appropriate, a minimum 20 Fr balloon retained tube is recommended. Please note, a balloon retained tube with an ENFitTM connection does not couple with The Insides Pump.
The Insides Tube 28Fr tube is recommended when applicable. If the 28Fr does not fit, smaller tubes can be used to reinfuse small boluses to rehabilitate the intestine. After a short period of intestinal rehabilitation, the patient may be able to transition to a version of The Insides Tube or transition from the 22 Fr to the 28 Fr Tube.
If a patient has a parastomal hernia, caution is needed when inserting the tube. If there is any uncertainty, it is recommended re-contrasting the distal limb to ensure patency (Refer to Contrast Imaging of Distal Intestinal Tract above. Possible bowel kinking can prevent the tube from being inserted and can create a risk of perforation. The increased external length of bowel can prevent the tube from being positioned and anchored correctly. Digitally palpating the distal intestinal limb will indicate the direction of distal intestinal limb, any narrowing or kinking, and the distance to fascia.
• The tube should not be advanced against any resistance or if advancing the tube causes the patient to experience pain. If tube intubation is unsuccessful or causes pain, discontinue the procedure and reassess patient suitability.
• If the distance to the fascia is greater than 70 mm, consider using a straight balloon retained tube that has no retention sleeve/cuff that can reach the fascia safely. The longer tube should not be advanced against resistance or if advancement causes the patient to experience pain.
• Ensure that there is suitable facial opening so that the tube does not migrate into the distal intestinal limb.
If the patient has a prolapsed distal intestinal limb of their enterostomy or enterocutaneous fistula (ECF), caution is needed when inserting the tube due to the extended, unsupported length of intestine that is external to the body. The Insides Tube is not suitable for this type of patient. To note, a prolapsed distal limb is generally viewed as a good sign the patient is ready for closure of their enterostomy or enterocutaneous fistula because the inflammatory adhesions have reduced and resolved.
• Following prolapse, there is an increased risk of bowel perforation when inserting a tube especially if the prolapse has been reduced. The patient should undergo careful assessment to determine if the risk of perforation can be reduced to a level which is outweighed by the potential benefit of chyme reinfusion therapy.
• Carefully consider whether the clinical benefit of chyme reinfusion therapy balances the increased risk of a potentially difficult tube insertion.
• Consider using a straight balloon retained tube that has no retention sleeve/cuff. The full length of the balloon retained tube may need to be inserted into the distal intestinal limb which means when The Insides Pump is attached, it may sit close to the outlet of the distal intestinal limb.
• The longer tube should not be advanced against significant resistance or if advancement of the tube causes the patient pain.
• Modifying an enteral feeding tube may cause the tube to migrate into the distal intestinal limb.
If a patient has an ECF, caution and careful clinical decision making are required when selecting the correct tube to use for the patient. Patients may have little or no fascia around the location of tube insertion. Consequently, a retention sleeve or cuff may not prevent the migration of the tube into the distal intestinal limb as it matures. An appropriate tube should be selected and monitored to ensure the migration does not occur.
The Insides Tube can be used with any ostomy appliance. Initially, it is recommended the patient use a clear ostomy appliance, so it is easy to watch chyme move up the tube and see the volume in the ostomy appliance decreasing. If a tube, other than The Insides Tube, is required initially, then this tube and pump must fit comfortably within the ostomy appliance without any pressure exerted on the tube and The Insides Pump.
The installation of a feeding tube into the patient’s distal intestinal limb may increase the size of the stoma on the abdomen. Consequently, it is recommended that the patient’s template on the base plate of the ostomy appliance, is re-measured. This is to ensure there is a clearance of 2 – 3 mm between the enterostomy and the edge of the base plate. This allows for peristalsis and the natural movement of the enterostomy and tube complex to prevent the risk of mucosal erosion due to rubbing on the side of the base plate. It is best to re-measure the patient’s template periodically. The base plate should also be re-measured if there have been any changes as a result of weight gain, weight loss, herniation, or prolapse.
When starting therapy with The Insides System, the patient will spend a short period of time increasing their tolerance to chyme reinfusion therapy, rehabilitating their distal intestine, and slowly introducing oral food. During this period, it is recommended to keep the patient’s parenteral nutrition prescription and anti-motility medication at the same dose. This will allow the patient to become independent with The Insides System and not become overwhelmed with the increase in their output from weaning the anti-motility medication. This will also maintain their nutrition while they are transitioning to reinfuse all of their output and ensure their nutrition is optimised.
*If printing, please print in A3 or larger

Prior to commencing chyme reinfusion therapy the patient’s distal intestine must be checked to ensure patency. A method of doing this is contrast imaging.
The Insides System contains two sizes of The Insides Tube, 28 Fr and 22 Fr. As a general guide:
If the Clinician determines that neither the 28 Fr or 22 Fr tube sizes are appropriate, a minimum 20 Fr balloon retained tube is recommended. please note, a balloon retained tube with an ENFitTM connection does not couple with The Insides Pump.
The Insides Tube 28Fr is recommended when applicable. If the 28Fr does not fit, smaller tubes can be used to reinfuse small boluses to rehabilitate the intestine. After a short period of intestinal rehabilitation, the patient may be ble to transition to a version of The Insides Tube or transition from the 22 Fr to the 28 Fr Tube.
If a patient has a parastomal hernia, caution is needed when inserting the tube. Possible bowel kinking can prevent the tube from being inserted and can create a risk of perforation. The increased external length of bowel can prevent the tube from being positioned and anchored correctly. Digitally palpating the distal tract will indicate the direction of distal limb, any narrowing or kinking, and the distance to fascia.
If the patient has a prolapsed distal limb of their enterostomy or enterocutaneous fistula (ECF), caution is needed when inserting the tube due to the extended, unsupported length of intestine that is external to the body. The Insides Tube is not suitable for this type of patient.
If a patient has an ECF, caution and careful clinical decision making are required when selecting the correct tube to use for the patient. Patients may have little or no fascia around the location of tube insertion. Consequently, a retention sleeve or cuff may not prevent the migration of the tube into the distal intestine as it matures. An appropriate tube should be selected and monitored to ensure the migration does not occur.
The Insides Tube can be used with any ostomy appliance. Initially, it is recommended the patient use a clear ostomy appliance, so it is easy to watch chyme move up the tube and see the volume in the ostomy appliance decreasing. If a tube, other than The Insides Tube, is required initially, then this tube and pump must fit comfortably within the ostomy appliance without any pressure exerted on the tube and The Insides Pump.
The installation of a feeding tube into the patient’s distal limb may increase the size of the stoma on the abdomen. Consequently, it is recommended that the patient’s template on the base plate of the ostomy appliance, is re-measured. This is to ensure there is a clearance of 2 – 3 mm between the enterostomy and the edge of the base plate. This allows for peristalsis and the natural movement of the enterostomy and tube complex to prevent the risk of mucosal erosion due to rubbing on the side of the base plate. It is best to re-measure the patient’s template periodically. The base plate should also be re-measured if there have been any changes as a result of weight gain, weight loss, herniation, or prolapse.
When starting therapy with The Insides System, the patient will spend a short period of time increasing their tolerance to chyme reinfusion therapy, rehabilitating their distal bowel, and slowly introducing oral food. During this period, it is recommended to keep the patient’s parenteral nutrition prescription and anti-motility medication at the same dose. This will allow the patient to become independent with The Insides System and not become overwhelmed with the increase in their output from weaning the anti-motility medication. This will also maintain their nutrition while they are transitioning to reinfuse all of their output and ensure their nutrition is optimised.
THE INSIDES® Driver (driver) should be fully charged before the first use. The charging light will turn ON while the driver is charging and will turn OFF when it is fully charged. The full charge cycle could take up to four hours. After each use of the driver, all accessible surfaces should be wiped down using a damp cloth followed by an EPA recommended disinfectant wipe. Before commencing prepare a clean work station and don gloves.
The patient must have visibility into the ostomy appliance to ensure that THE INSIDES® System is successfully reinfusing chyme. Use a clear ostomy appliance or remove outer lining of the patient's usual ostomy appliance to ensure adequate visibility.
THE INSIDES® Pump (pump) is 35 mm in diameter and will be threaded through template of the ostomy appliance. Therefore, a larger template may need to be cut and a hydrocolloid seal used to protect the exposed skin. If this is not suitable an ostomy appliance with a “lock and roll” closure at the bottom of the bag can be used. In this scenario, the pump will be connected to THE INSIDES® Tube (tube) through this opening.
THE INSIDES® Tube must be inserted by a healthcare professional. The Insides® Tube must be replaced every 28 days.
1. Select the appropriately size feeding tube based on the diameter of the patient’s
stoma.
2. The patient should be resting in a comfortable supine position. Remove the patient's ostomy appliance and wipe away any excess chyme from the area. Only reinfuse chyme that is less than eight-hours old. Store the patient's chyme if this is the first use of THE INSIDES® System.
3. Unpackage the tube. A retention sleeve and guidewire are also provided to aid user comfort and insertion, respectively.
4. Lubricate the tube using 10-20 mL of water-based lubricant as described below:
a. Unfold the arms of the retention
sleeve from the tube.
b. Spread lubricant in front of and
behind the retention sleeve. With adequate force, pull the retention sleeve backward, towards the handle of the guidewire, over the lubricant, then return it to its original position. Continue this until the retention sleeve moves freely. Add more lubricant if it is required. Then, move the retention sleeve towards the bulbous section of the tube. Ensure the retention sleeve is not pulled off.
c. Lubricate the bulbous section of the tube.
d. Set the tube aside on the clean workstation.
5. With additional lubricant, digitally examine the direction of the
distal tract. Palpate the fascia to gauge the approximate length required for the insertion of the tube. If the distal tract is tight or kinked, insert 3-10 mL of additional lubricant.
6. During the examination, the patient may feel some abdominal discomfort. Discomfort is due to the stretching of the intestinal lumen and should be expected. After digitally palpating the distal tract, replace gloves.
7. Collapse the tube's bulbous feature by inserting the guidewire until the base of the tube touches the 'stop' on the guidewire. Pinch the guidewire between the tube and maintain pressure so it stays in place. Ensure that the guidewire's tip is sitting within the nose of the tube and not sticking out through the bulbous section.
8. While the bulbous section is collapsed, use the free hand to guide the tube and insert it into the distal limb. Apply gentle pressure until the bulbous feature of the tube is 10-20 mm past the abdominal fascia. The intestine may not allow the tube to be immediately inserted; it may take up to 60 seconds for peristalsis to help move the tube into place.
9. Firmly hold the tube in place with one hand and remove the guidewire with the other.
10. Allow the tube to settle into its natural position. The tube may move outwards up to 10mm due to peristalsis.
11. Move the retention sleeve up the tube until it sits 1-2 mm away from the stoma. Fold the arms of the retention sleeve over the tube to secure it in place.
Due to differing patient anatomy, the retention sleeve may block the proximal outlet. If this occurs, chyme may leak under the baseplate of the ostomy appliance. If this happens, the retention sleeve can be moved down the tube, away from the stoma.
12. Gently tug on the tube to confirm it is anchored in place.
13. If the tube becomes dislodged, remove it entirely from the patient before reinserting the guidewire into the tube:
a. Move the retention sleeve toward the bulbous feature.
b. Insert lubricant into the Tube.
c. Insert the guidewire into the Tube, beyond the retention sleeve in a single fluid
motion.
d. If the guidewire does not slide beyond the retention sleeve, move the guidewire's tip back into the lubricant, then repeat Step c.
e. Hold the guidewire in place and move the retention sleeve to the centre of the Tube.
f. Return to Step 3.
14. Once the tube is successfully inserted, dispose of the guidewire appropriately.
WARNING: Do not insert the guidewire into the Tube while it is positioned inside a patient - this could result in perforation of the bowel.
NOTE: Peristalsis may move the tube in and out of the stoma slightly. When placed correctly, the tube should not fall out on its own and the retention sleeve will prevent it from being pulled too far into the distal intestine.
1. Connect the pump to the tube. The base of the tube should touch the third ring of the pump outlet to ensure it cannot be accidentally dislodged.
2. Allow the patient or their carer to practise connecting and disconnecting the pump while ensuring that the tube position is not disturbed.
3. Measure the ostomy appliance against the tube and pump. Trim the end of the tube so
that the pump sits 10-20 mm above the bottom of the ostomy appliance when attached.
4. The pump can rotate around the tube until oriented such that the position allows the connecting of the pump to the driver.
A clip is provided to hold the tube in place. Once the Ostomy appliance has been applied, a clip can be attached to the tube from the outside of the bag to help prevent the tube falling out and reduce pulling on the stoma. Choose the clip that will fit around the section of the tube immediately below the retention sleeve. This will depend on the size of the tube and how short the tube is trimmed. Ensure the patient is aware of which clip should be used.
1. Assess the suitability of the patient's chyme from the patient's previous ostomy
appliance.
a. Pinch the ostomy appliance between the thumb and forefinger. Release it quickly to observe the time it takes for the chyme to refill the space. If it is instantaneous, the chyme can be pumped; otherwise, it may be too thick and should be discarded.
b. Chyme sitting for less than eight hours is suitable for pumping; otherwise, it must be discarded.
c. There must be enough volume for the Pump to be fully submerged in the chyme, approximately 70-100 mL.
2. If the patient's chyme is suitable for reinfusing, transfer the chyme into the new ostomy appliance. If not, fill a new ostomy appliance with enough water to submerge the Pump. Water can be used to demonstrate chyme reinfusion to the patient. Ensure the patient understands that they should not add water to the ostomy appliance in any other setting. Secure the ostomy appliance as described above.
1. Ensure the pump is fully submerged in the chyme.
2. Magnetically connect the pump to the driver.
a. Hold the driver and pump in an orientation allowing the user to see the tube. The user should be able to be to see whether chyme is progressing up the tube.
3. Reinfusing chyme stretches the luminal walls of the bowel, which may cause abdominal discomfort. To reduce this discomfort, begin chyme reinfusion slowly. For more information, refer to the ETD-14 Patient Management listed on The Insides Company Training Portal.
a. While holding the pump against the driver, press the 'MODE' button to start at 'MODE 1', the slowest speed setting. If chyme moves quickly up the tube, stay on 'MODE 1' and reinfuse a small volume of chyme.
b. After 30 seconds, if chyme is not progressing up the
tube, increase to the next ‘MODE’. Continue this process until chyme is progressing up the tube. If chyme is not progressing up the tube after 60 seconds on 'MODE 5', refer to the Troubleshooting section below.
c. If chyme starts to reflux out of the stoma, or if the patient feels nauseous or bloated, reduce the 'MODE' on the driver or cease reinfusing for several minutes. Reducing the ‘MODE’ can be accomplished by pressing the ‘MODE’ button, which transitions through all five speeds and off. For further information about reflux, refer to the Troubleshooting section.
4. After reinfusing a small amount of chyme, decouple the driver from the pump and turn it off by cycling through each ‘MODE’.
Ensure the patient receives routine ostomy appliance changes. Make sure the patient takes care when removing the appliance so that the tube is not pulled out. The pump may get caught in the ostomy appliance upon removal. Ensure the patient holds onto the tube with one hand and removes the ostomy appliance with the other hand. If this is too difficult, detach the pump from the tube within the ostomy appliance to be removed together.
The time required to reinfuse chyme varies depending on the chyme's thickness, which may differ across the day and the patient's oral intake. THE INSIDES® System is not suitable for thick or fibrous chyme, therefore some chyme may be discarded. Any amount of chyme that is refed is beneficial.
The patients using THE INSIDES® System should adhere to the following steps for optimal results:
If reinfusion takes longer than expected or if the patient is unable to reinfuse, attempt the following remedial steps:
If none of these solutions work, THE INSIDES® System may not be suitable for the patient.
When using THE INSIDES® System, patients may experience reflux of chyme from the distal intestine, around the tube, back into the ostomy appliance. Reflux occurs when the distal intestine receives more chyme than it can accommodate. While reflux is not harmful to the patient, it can increase its time to reinfuse successfully.
Reflux may be reduced by:
NOTE: Loperamide and similar anti-motility therapies can cause constipation, blocking the intestine and preventing chyme reinfusing. Adjust the dose of motility therapies as required and refer to ETD-14 Patient Management with The Insides System if further action is needed.
As stated in the warnings, there is a low risk that THE INSIDES® Tube may migrate into the intestine, most commonly due to natural peristalsis or patient movement. Management of ube migration must only be performed by trained healthcare professionals.
The Tube Migration Management resource is available on our website and through The Insides Company Training Portal. This document provides detailed guidance on safe removal intervention procedures.
Patients must not attempt to remove the tube themselves under any circumstances. If migration is suspected, the patient should contact their healthcare professional immediately.
Any serious incident that has occurred in relation to THE INSIDES® System should be reported to the manufacturer and the Competent Authority of the Member State in which the user and/or patient is established.
If you would like to watch the Insides System setup video, watch the video below:
If you would like to watch a particular section of The Insides System setup video, choose the section below and watch the video:
The Insides Driver Feature Explanation
Performing refeeding for the first time
*Please note that some videos have been marked restricted and may require Youtube account login in order to access the video.
Chyme:
Content which exits from the stoma
Chyme Refeeding/Chyme Reinfusion
The act of delivering chyme into a patient’s lower intestine
Healthcare Professional
Surgeons/Doctors/Nurses
Ostomy Appliance
A bag which sits on the stomach and collects content from the Stoma
Drinking water
Water that is safe to drink or use for food preparation without the risk of health problems
Stoma
A surgically created opening on the abdomen
THE INSIDES® Port is an accessory intended to be used with THE INSIDES® System.
This accessory is specifically designed to allow patients to remove gas from their ostomy appliance and add fluid to their chyme to reduce the viscosity, enabling the use of THE INSIDES® System.
THE INSIDES® Port is for single patient use only.
THE INSIDES® Port must be replaced every three days.
THE INSIDES® Port is an accessory intended to be used with THE INSIDES® System for patients with thick chyme or excess gas in order to transfer fluids into or out of an ostomy appliance. THE INSIDES® System is used to return fluids and nutrients (chyme) lost from enterocutaneous fistulas and/or enterostomies by refeeding chyme into the intestine.
THE INSIDES® Port is an accessory intended to be used with The Insides System in order to return chyme to the intestine.
THE INSIDES® Port is NOT suitable for patients who:
• Are not using THE INSIDES® System
• Do not have access to potable water
Caution: For THE INSIDES® System Contraindications, please refer to THE INSIDES® System Instructions and Technical Description
Thoroughly read this document before using THE INSIDES® Port.
Use this document in conjunction with THE INSIDES® System Instructions and Technical Description and THE INSIDES® System Set-Up Guide.
Thoroughly read THE INSIDES® System Instructions and Technical Description and THE INSIDES® System Set-Up Guide before using THE INSIDES® Port.
Do not use if packaging is damaged or opened. If the packaging of THE INSIDES® Port is damaged prior to use, discard the product. – Contamination could lead to patient infection.
THE INSIDES® Port is for single patient use ONLY, and is not to be shared between patients. – Contamination could lead to patient infection.
Failure to carefully follow all applicable instructions may result in injury to the patient, physician, or attendants and may have an adverse effect on outcome.
Care should be taken when removing THE INSIDES® Port from packaging and installing it onto the ostomy appliance, to ensure that it is not contaminated before being used by the patient. – Contamination could cause patient infection.
Ensure that only drinking water, or fluids approved by a healthcare professional are added to an ostomy appliance. – Addition of contaminated water or other fluids could cause patient infection, toxicity or hospitalization.
THE INSIDES® Port should be disposed of in accordance with local refuse regulations. – Contamination could lead to patient infection.
The Insides System and its accessories, including the non-patient-contacting mains charger, uses materials such as polyamide (PA), polycarbonate (PC), poly(butylene terephthalate) (PBT), silicone, polypropylene (PP), acrylonitrile-butadiene-styrene (ABS), and nitrile butadiene rubber (NBR). These materials have a long history of safe use in medical devices with similar skin and mucosal contact.
The device does not contain any materials that fall under FDA Attachment G Section C exclusion criteria.
For best results, set up The Insides Port 24 hours prior to use by following the instructions below:
The Insides Port can be set up with any ostomy appliance, however if it is the first time, it is recommended to confirm a watertight seal before attaching it to your abdomen:
1) Prepare the Ostomy Appliance: Take a new ostomy appliance and identify where The Insides Port will be placed. It is recommended that The Insides Port is placed
- Off centre to the stoma, so that it is not resting on the stoma
- On a surface that will not be bent, or tucked into the waistline
- On a surface that has no wrinkles or folds, so the adhesive doesn’t leak
- Above where the ostomy appliance fills up, so chyme does not sit against it.
2) Remove extra fabric off the ostomy appliance: Some ostomy appliances have extra layers for comfort or opaque fabric for discreteness. These layers will need to be removed so that The Insides Port can be attached to the layer containing Chyme.
3) Prepare the ostomy appliance surface: Some ostomy appliances require the surface to be cleaned prior to attaching The Insides Port. Rubbing the surface with a lint free cloth may be enough. If not, gently apply 90% or greater Isopropyl alcohol (Isopropanol) with a lint free cloth until the surface shine is dulled or removed.
4) Cut the ostomy appliance: Once access to the layer containing chyme has been reached, ensure it is free from oils, grease, debris and water. Fold the layer in half where you want the centre of The Insides Port to be attached. Cut a small ‘V’ on the fold line no more than 5mm (3/8”in) deep and wide.
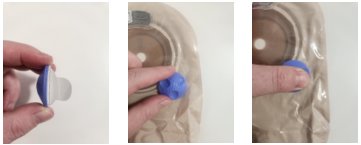
5) Secure The Insides Port: Remove the adhesive liner from The Insides Port and firmly press it into the ostomy appliance. Ensure the centre of The Insides Port covers the ‘V’ cut entirely. Press all the adhesive, making sure there are no folds of plastic where fluid could leak through.
For best results attach The Insides Port 24 hours before use, to allow the adhesive to bind securely to the ostomy appliance before it comes in contact with fluid.
Natural oils on the skin and other contaminants will reduce the adhesion of The Insides Port to the ostomy appliance.
If aligning The Insides Port to the ‘V’ cut is difficult, do not carry out this step. Attach The Insides Port to the ostomy appliance, then puncture the Ostomy appliance with a sharp object. Ensure safety precautions are taken and, that the Ostomy appliance is not being worn at the time.
1. Prepare for Fluid Transfer: Once chyme and gas has collected in the ostomy appliance, the Cap of The Insides Port can be removed. Ensure chyme is not sitting at the same level as the Port opening, otherwise chyme could be released.
2. Attach Syringe: Once the Cap has been removed, gas can escape from the ostomy appliance. To add fluid, fill a Luer Lock syringe with potable water and connect it to the base of The Insides Port with a twisting motion.
3. Add Water to the Ostomy Appliance: Depress the syringe until the desired amount of water has been added to the ostomy appliance.
4. Seal The Insides Port and Mix: Once the syringe has been depressed, twist the syringe in the opposite direction to detach. Replace the Cap to the base of The Insides Port to seal the ostomy appliance. Once sealed, the bag can be agitated to loosen the content of the ostomy appliance.
THE INSIDES® Port
Mass (kg) 0.01
Dimensions (m) 0.03 x 0.03 x 0.01
Colour Purple
External Material Polypropylene
Internal Materials Polypropylene
Maximum Storage Period 3 years
Maximum Use Period 3 days after installation
Permissible Environmental Conditions of Use
Temperature 0°C – 40°C 32°F - 104°F
-5°C – 40°C 23°F - 104°F
Humidity 100%RH Max
Conditions for Transport and Storage
Temperature 0°C – 40°C 32°F - 104°F
Humidity 90%RH Max
Any serious incident that has occurred in relation to THE INSIDES® System or accessories should be reported to the manufacturer and the Competent Authority of the Member State in which the user and/or patient is established.
After use, handle and dispose of this product in accordance with accepted medical practice and applicable local, state, and federal laws and regulations.
This information can be sourced from your local authority or from the supplier of the medical device in your region.
The Insides Port should not be cleaned as it can result in contamination of the product and may result in patient harm.
The Insides Company warrants that the device, when used in accordance with the instructions for use, shall be free from defects in workmanship and materials and will perform in accordance with The Insides Company official published product specifications for a period of 2 years from the date of purchase by the customer. This warranty is subject to the limitations and exceptions set out in detail here: www.theinsides.co/warranty-statement
For Safety Signs and Symbol Glossary, please refer to THE INSIDES® System Instructions and Technical Description
This work instruction is to act as a visual prompt and reminder of the key tasks but does not contain all the necessary information.
Before using this document, thoroughly read The Insides® System Setup Guide and The Insides® System Instructions and Technical Description.
a. Take a new ostomy appliance and decide where to place The Insides Port. It is best placed in the top third of the appliance, off-centre and not covering the stoma. Remove the cover of the ostomy appliance if there is one.
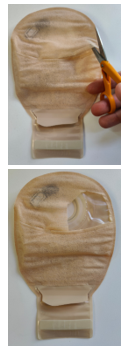
b. Prepare the surface of the plastic so the shine has dulled or been removed. This can be completed with a lint-free cloth or an isopropyl alcohol wipe.
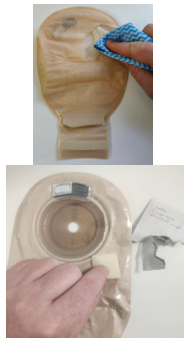
c. Ensure surface is dry and clear of debris. Pinch plastic and cut a ‘v’ shaped hole, no bigger than 5mm deep and wide.
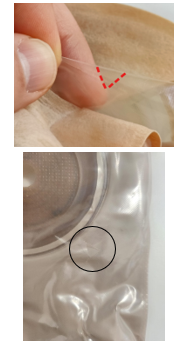
d. Peel the backing off The Insides Port and place directly over the hole in the ostomy appliance, making sure there are no folds of plastic. Press and hold firmly for 10 seconds.
a. Prepare The Insides® Tube

b. Unwrap the arms of retention sleeve.

c. Ensure the retention sleeve is positioned towards the base of the tube.

d. Ensure the guidewire sits in the tip of the bulbous feature.

e. Lubricate the bulbous section of the Tube.

1. Digitally palpate the distal intestine to determine if the Tube is suitable, and the direction and distance to the fascia

2. Prepare the Tube for insertion. Collapse the bulbous feature of the Tube by inserting the guidewire until the base of the Tube touches the stop of the guidewire. Pinch the guidewire through the tube to maintain the position.

3. Pinch the bulbous feature and roll it between your fingers to further collapse the Tube. Apply more lubricant if required.
ENSURE THAT THE GUIDEWIRE REMAINS WITHIN THE TIP

4. Hold the Tube and guidewire together firmly. Insert the Tube and apply gentle pressure until the whole Tube, up to the retention sleeve, is inserted into the stoma/fistula. This ensures the bulbous feature is beyond the fascia. The Tube can be inserted at any angle that is required.

5. Hold the retention sleeve to keep the Tube in place and remove the guidewire.
6. Allow the Tube to settle in its natural position then move the retention sleeve so it sits 1-2 mm away from the stoma.
7. Wrap the arms of the retention sleeve back in place.

8. Hold the ostomy appliance against the Tube and Pump to determine the appropriate length of tube.
Anytime the Tube is not within an ostomy appliance the patient should hold the Retention Sleeve and Tube inplace with their hand. This is especially important when they are changing positions (lying to sitting to standing) and moving around so the Tube does not slide out of their stoma or fistula.

9. Trim the Tube to the desired length.
10.Connect the Pump to the Tube. The Pump should be pressed up to the third ring.

11.Supervise the patient threading on their ostomy appliance and securing it to their abdomen. Ensure there is a 10-20mm gap between the Pump and the outlet.

12. Secure the Clip to the Tube when the patient stands up.

Before using this document, thoroughly read The Insides® System Setup Guide and The Insides® System Instructions and Technical Description.
This work instruction is to act as a visual prompt and reminder of the key tasks but does not contain all the necessary information.


This document is to be used in conjunction with IFU-1 The Insides® System Instructions and Technical Description, and IFU-2 The Insides® System Setup Guide for Healthcare Professionals
Before using this document, thoroughly read Gastrostomy Tube Insertion and The Insides® System Instructions and Technical Description.
This work instruction is to act as a visual prompt and reminder of the key tasks, but does not contain all the necessary information.
1. Prepare the workstation.

Prepare the Cook Entuit 24Fr tube.

Double bung the Enteral meds only port and remove the cardboard tag

Inflate the balloon with 10mL sterile water to ensure the balloon is symmetrical. Then deflate the balloon

Lubricate the tip of the Cook Entuit 24Fr tube
2. Digitally palpate the distal limb of the enterostomy or enteroatmospheric fistula. This is to gauge any narrowing, direction, and distance to fascia.

3. Insert the Cook Entuit 24Fr tube into the distal limb of the intestinal tract.

Slowly insert the tube with the dominant hand.

Guide the tube further into the stoma with the non-dominant hand to the predetermined length.

Move the cuff so it sits 1-2 mm from the Stoma outlet.
4. Inflate the Cook Entuit 24Fr balloon with 4ml of sterile water.

5. Thread the baseplate over the tube and adhere it to the skin around the stoma.

6. Connect the Insides Pump to the FEED ONLY port of the Cook Tube. The tube should be pressed up to the second ring of the pump

7. Place the tube in the Ostomy appliance and connect the bag to the baseplate.

Patients with an enteroatmospheric fistula or high-output enterostomy should be closely monitored when first introduced to The Insides® System. The following points should act as a guideline to ensure successful patient outcomes. This document should be used in conjunction with The Insides® System Instructions and Technical Description and The Insides® System Setup Guide.
Refer to The Insides® System Setup Guide for setup instructions to The Insides® System.
The first week of chyme reinfusion therapy for the patient is going to be the hardest due to the discomfort of reintroducing chyme into the distal intestine, learning how to change their ostomy appliance with the Tube in situ, troubleshooting, and minor modifications to their diet. Please establish this at the beginning and continue to provide support in the initial phase of chyme reinfusion therapy. In turn, please reassure the patient that this will pass and performing chyme reinfusion therapy will provide them with many benefits.
To provide further securement of The Insides® Tube (Tube), secure The Insides® Clip (Clip) to the outside of the ostomy appliance, over the Tube, and as close to the bottom of retention sleeve as possible. This Clip provides a second anchor point for Tube to stop it from sliding out from peristalsis. Please view How to use The Insides® Clip and Retention sleeve video and Patient applying The Insides® Clip video for further clarification.
During the first session, use the patient's chyme to demonstrate refeeding. Refeeding with chyme provides a more realistic understanding of the time requirement, which is longer than refeeding water. Chyme must be less than eight-hours old, and the ostomy appliance should be at least one-third full.
The patient's first refeed of chyme may cause lower abdominal discomfort and bloating due to bowel distension. A small volume of chyme should be initially refed, at regular intervals, to minimise discomfort.
The volume of refed chyme will vary among patients. For example, a patient with a newly formed stoma may be able to refeed 100 mL of chyme once or twice a day, while a patient who has been defunctioned for over a year may only be able to refeed 50mL in a day. Most patients take one week to be rehabilitate their distal bowel and refeed at least 90% of their output. It is not unusual for some patients to take up to a month to establish routine refeeding, and this is due to the increased length of time that the patient has been defunctioned. Increasing a patients tolerance to refeeding is explained further below. Mild to moderate analgesia can reduce patient discomfort if required.
For efficient refeeding, the patient should sit on the edge of the bed with their feet flat on the ground or standing up with at least three points of contact for balance. This ensures all chyme is sitting at the bottom of the ostomy appliance. Ensure the Tube is straight down in the ostomy appliance so The Insides® Driver (Driver) does not have to work against bends in the Tube. Ensure the patient has a good view of the Tube and can see the chyme moving up the Tube. Support them with finding a comfortable position to hold the Driver for effective refeeding.
The Tube can take up to 48-hours to settle into its natural resting position. Peristalsis may push the Tube out slightly, changing the resting position. The retention sleeve may need to be adjusted to ensure the Tube maintains a flat profile against the body. The Tube length may require additional adjustment to ensure that The Insides® Pump (Pump) is appropriately placed and not pressed against the end of the ostomy appliance.
The use of the Clip is helpful in this initial period to help keep the Tube in place and reduce movement.
The patient should feel comfortable while the Tube is in situ. Pain around the distal stoma, or significantly more Tube visible in the ostomy appliance, may signify that the Tube has slipped from underneath the fascia and is resting at skin level. If this occurs, the Tube will need to be removed and reinserted.
The patient should continue to refeed at very low volumes for the first few days and only increase to their own tolerance. This reduces the amount of discomfort they may get from bolusing chyme into a defunctioned intestine. Bolusing chyme stretches the luminal wall of the intestine which creates the discomfort. Please see the Frequently Asked Question: Increasing Patient Tolerance to Chyme Reinfusion for guidance on how to complete this safely. In the first week the patient may experience reflux which is chyme that has been refed but trickles back into the ostomy appliance. Reflux is not harmful but it does increase the length of time to refeed. Reflux occurs because the intestine is unable to absorb the volume of chyme that is being bolused. To reduce reflux, refeed little volumes, around 50 ml, every 2-3 minutes to assist in rehabilitating the distal intestine. Gently hold the retention sleeve on the Tube, up close to the mucosa of the stoma while reinfusing to encourage the bolus of chyme to be absorbed and reduce reflux.
When a patient refeeds using The Insides® System (System), chyme passes through the entire gastrointestinal tract; therefore, a patient's output is calculated as follows:
Output = Volume of Vomitus + Volume of Urine + Volume of Chyme Discarded into the Toilet
The output calculation does not include the volume of chyme, which is refed. Instruct the patient on maintaining the Patient Fluid Balance Chart, which will provide the healthcare team with an overall picture of device use and an accurate measure of the patient's fluid balance. Once the patient is home, encourage the patient to continue monitoring their fluid balance by using The Insides Log Book, that is provided in the System box. This will provide the healthcare team visibility on the patients progress while at home.
Once a patient has started refeeding, they can begin consuming food to wean off parenteral nutrition. Patients should start oral feeding slowly with small meals and it is recommended to be under the guidance of a Dietician. Once a patient starts oral feeding, their output will increase, please reassure the patient this is expected and will slow down once their distal bowel is rehabilitated and adjusting their anti-motility medication. Patients should chew their food well and avoid stringy, fibrous foods to ensure that the Pump does not block. Refer to the Dietary Recommendations for The Insides® System for more information.
Most patients will beon high doses of Loperamide or other anti-motility medication. Due to thismedication being gut-restricted with low bioavailability, by introducing chymereinfusion therapy, the enterohepatic recycling process will be re-engaged thuschyme viscosity will increase dramatically. Loperamide needs to be weaned oncea patient is independent with The Insides System to reduce this effect. Theileal brake, a physiological process, will also re-engage due to entericcontent flowing through the terminal ileum. The ileal brake reduces gastricsectretions, further reducing and thickening output naturally. Loperamide needsto be weaned to not compound these natural processes and prevent constipationin the colon. Complete weaning over 1-2 weeks.
Refeeding with The Insides® System provides a longer length of bowel for absorption. Medication toxicity is possible for patients on oral medications with a narrow therapeutic range, such as Warfarin. Closely monitor drug levels and adjust doses, where necessary, when using The Insides® System.
If the patient is using a night bag to collect night time losses to reinfuse in the morning (within eight (8) hours), short-acting-medication must be taken four (4) hours before attaching the night bag. This is to ensure the medication has transited and been reinfused down stream before attaching the night bag.
Monitor drug doses closely during the initial phases of refeeding and when the patient is discharged home as compliance is likely to drop.
Close monitoring of biochemistry, renal blood levels, increasing oral feeding, and reducing the amount of chyme discarded will guide weaning off PN and IV fluids. Refer to the Suggested Chyme Reinfusion and Parenteral Nutrition Weaning Guidelines for more information. Time taken to wean off PN will be dependent on individual patient characteristics but ensuring a level of independence with the device is necessary so that patients are able to maintain high use of the device.
Patients will likely have a bowel movement within the first two to four days of refeeding, depending on the frequency and volume of refeeding. The frequency of bowel movements is also influenced by the patient's physiology and the amount of colon that remains in circuit. The first bowel movement will likely have a Bristol 5 or 6 consistency, progressing towards a Bristol 3 to 4 by the end of the second week. Bowel movement consistency will be affected by Loperamide use and length of colon the patient has available for reabsorption. If the patient is comfortable and showing no signs of clinical constipation, just wait for the first bowel movement. If there are clinical signs of constipation, consider making up a Macrogol with 150-200ml warm water and reinfusing it downstream with The Insides Driver or using an enema.
Reintroducing chyme downstream may ignite a Clostridium difficile infection that was lying dormant in the colon. If this occurs, monitor the patient and treat it accordingly. Low-level colitis may be present in patients that have been defunctioned for an extended period. This complication should resolve in 2-3 weeks.
Consistently encourage and support the patient to use The Insides® System independently throughout the first week. This includes modifying their process when changing their ostomy appliance. Support and monitor the patient the first few times they change their ostomy appliance so they understand how to safely thread the ostomy appliance over and off the Tube and Pump and then when resecuring the appliance once the Pump has been changed. Allow the patient to practise and record their use to improve their understanding and refeed as part of their daily routine. A well-supported patient in the hospital will likely continue to use the device once at home.
Patients may be ready for discharge to home in the second week. Before discharge, ensure that the patient's blood results are trending towards normal. If the healthcare team is satisfied with the patient's progress and is adequately competent with The Insides® System, they may be discharged home. Refer to Discharge Planning Checklist to ensure a safe discharge home. Utilise the Community Referral form to assit with a smooth transition home.
A stomal therapist trained on The Insides® System should visit the patient within 48-hours after discharge. The goal of the home visit is to address and troubleshoot any issues with the System.
Once discharged home, the patient may become dehydrated, leading to acute renal impairment. This issue occurs most often when:
To address issues with dehydration and renal impairment:
At this stage, the patient will be returning to their regular routines, including returning to work, resuming household duties, and reducing visits with the stomal therapist. Compliance with the System may wain, and renal impairment may increase during this period. Regular creatinine/eGFR monitoring is crucial during this stage to negate renal impairment.
Proper use of The Insides® System and adequate nutrition will prepare the patient for a successful stoma reversal surgery. Increasing protein and carbohydrate stores with positive weight gain optimises recovery.
Once the patient becomes independent with The Insides® System, visits from the stomal therapist will decrease. The stomal therapist will still need to visit once a month to change The Insides® Tube and conduct assessments. Regular weekly phone calls with the patient renal monitoring will continue where clinically indicated.
Discharge Planning Checklist
Patient independence
Is the patient independent with using The Insides® System and simple trouble shooting?
Is the patient independent with their ostomy care in relation to Tube and Pump management?
Has the patient been given advice on signs and symptoms of dehydration and other complications that require them to return to hospital? (Return advice)
Medication
Has their medication been reviewed and reconciled by the Pharmacist to account for potentially higher enteral absorption?
Community Stomal Therapy Team
Have the receiving stomal therapy team received training on The Insides® System and patient management?
Does the stomal therapy team know how to order Refill kits?
Is there wound care follow up required?
Ensure contact details for clinical support with The Insides Company have been provided.
Patient information and supply
Has a surgical team follow-up plan been arranged for the patient?
Does the patient have the contact details for their local stomal therapy nurse?
Does the patient have the Patient Guide to Chyme Reinfusion Therapy with The Insides System
Do they have a lab form for bloods once discharged home?
Does the patient have enough ostomy supplies and Pumps for the first two weeks at home?
Is the patient able to access/pick up their discharge medication?
To complete this competency framework and be deemed competent, a nurse must undertake the following:
Upon completion on the framework, a nurse will be competent in the following skills:


All copyright, design and intellectual property rights existing in our designs and products and in the images text and design of our website are the property of The Insides® Company. The innovations developed by The Insides® Company are covered in one or more pending patents.
The following are pending patents of The Insides® Company:
WO2019073365(A1)
WO2019171335(A1)
WO2022224175A1
The following are registered patents of The Insides® Company:
CN111818885B
AU2018349270B2
The following are registered designs of The Insides® Company:
CN307984577S
30202300143W
30202300144U
AU202217736
AU202217737
EP015007939-0001
EP015007939-0002
UK6253298
UK6253299
NZ430941
NZ430942
The following are trademarks of The Insides® Company:
The Insides
The Insides Company

Please contact the company for an updated list of IP.
‘Coloplast’, ‘SenSura® Mio ’ are registered trademarks of Coloplast Corporation. The use of the trademarks ‘Coloplast’, ‘SenSura® Mio ‘in these instructions is strictly for informational purposes to provide accurate product information to our customers. The Insides Company Limited does not connote any endorsement, affiliation, sponsorship, or approval by Coloplast Corporation. We hereby affirm our recognition of Coloplast Corporation 's exclusive intellectual property rights in the trademark ‘Coloplast’, ‘SenSura® Mio,' and any references to said trademark are made in good faith to truthfully describe the compatibility or usage of their product.
‘Hollister’, ‘Pouchkins™’ are registered trademarks of Hollister Incorporated. The use of the trademarks ‘Hollister’, ‘Pouchkins™‘in these instructions is strictly for informational purposes to provide accurate product information to our customers. The Insides Company Limited does not connote any endorsement, affiliation, sponsorship, or approval by Hollister Incorporated. We hereby affirm our recognition of Hollister Incorporated 's exclusive intellectual property rights in the trademark ‘Hollister’, ‘Pouchkins™,' and any references to said trademark are made in good faith to truthfully describe the compatibility or usage of their product.
© 2025 The Insides Company. All copyright, design, patent and intellectual property rights existing in our designs and products and in the images, text and design of our website / marketing material are the property of The Insides Company.

.png)

.png)


.png)